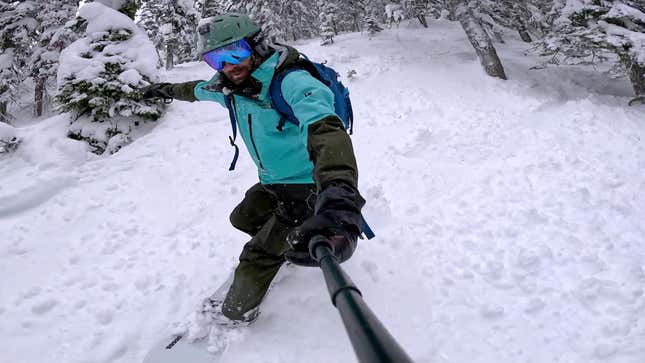
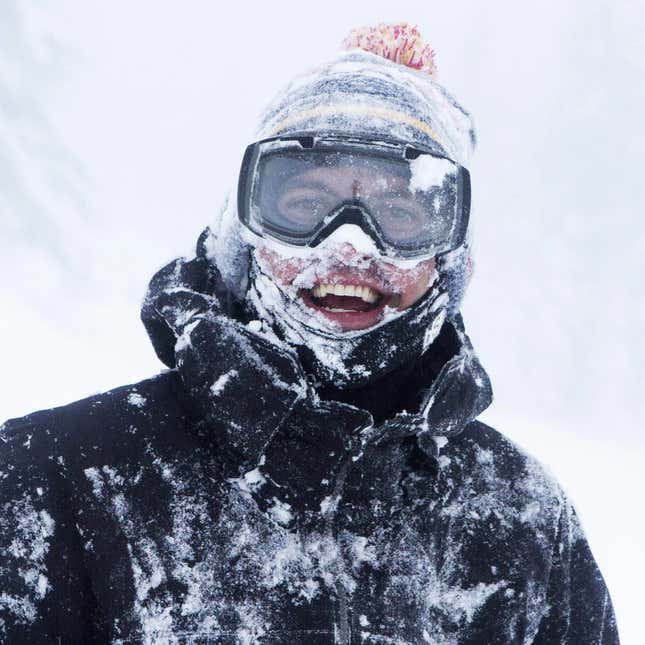
There are a lot of factors that contribute to a good day on the slopes. Weather, terrain, and ability level are all important, but having the right equipment can mean the difference between having a comfortable, safe, and thrilling day, and tumbling down a mountain while freezing your ass off. Here then, are my picks for the best gear for winter fun, of the downhill variety.
Best of all, it has been an absolute banger of a year for snow in the western U.S. Several resorts have broken their all-time record for snowfall, including Mammoth, which has received more than 73 feet of snow on the summit this season. Absolutely bonkers. Many resorts are extending their seasons, and Mammoth specifically will likely be open well into the summer, so yes, April is a perfect time to release a roundup of the best snow gear, obviously.
Some caveats! I’m just one person, and while I have been extensively testing a wide variety of gear for the last decade-plus, I have my own preferences/style/ability level/Seinfeldian-manias. There’s also only so much I can test in any given season, though I do thorough amounts of research before I decide what to try out. It’s also worth noting that the same supply-chain issues that have impacted every industry seem to have hit the snow-sports industry particularly hard, for reasons I do not fully understand. That’s partly why this guide is coming out in April instead of December or January, and it’s why some of these items have been and continue to be tough to find. It’s also worth noting that while I’m a high-level snowboarder, I am a very mediocre skier. The vast majority of the gear in this guide can be used for either sport, but I haven’t included recommendations for skis or ski boots, because frankly I’m not qualified to speak on their nuances. That said, when we update this piece (hopefully early) next season, we’ll be tapping an expert skier or two to weigh in on those categories as well.
Oh, and in case any of this is too jargony for you, we’ve included a glossary down at the bottom.
Okay! Let’s get to it.
The Best Snowboards
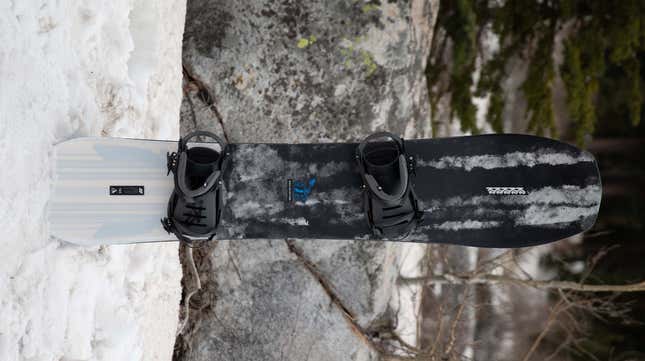
K2 Excavator - $550
This year’s standout board was the K2 Excavator. It does two things really, really well: float and carve. You can tell just from looking at it, that this board is a powder specialist. It has a directional shape with a built-in setback, a big, fat nose, a wide overall profile, and a shallow swallow tail that sinks your back foot and keeps your nose up. It’s high volume, so you can ride it on the shorter side, and you’ll still be able to glide through thigh-deep powder effortlessly. It really excels in the trees, but it’s no slouch on the groomers, either. This board is fantastic for really sinking your edge in and drawing out a deep scar in the corduroy. It has enough tail that it’s great for landing jumps, too. The one place where I’d hesitate to use it would be when things get really steep and icy (or if I wanted to ride switch). It’s not the most technical board out there, but it’s the most fun I’ve had on a new board in a long time.
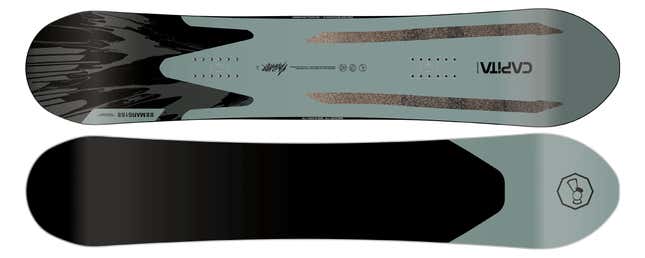
Capita Navigator - $480
This board is more of an all-rounder, but one that is still built to handle powder (I don’t ride anything that isn’t good in pow). It’s still a directional board, but much more subtly than the K2 above. The nose is wider than the tail and the sidecut tapers nicely to give you more volume in the front than in the back. The result is a board that feels very balanced. I always felt in control when I was on groomers, and it had more float than I expected in the deep stuff (though it’s not as effortless as the Excavator, and my back leg tired more quickly). I really liked this board a lot when the conditions were less than perfect. It has cork inlays which you can see in the front of the board. These provide a ton of vibration dampening in rough, chopped up snow. It also has an NFC tag embedded in the nose, which should make it easier to prove it’s yours, should that ever be in dispute. This is just a really well-rounded, all-mountain board.
The Best Snowboard Bindings
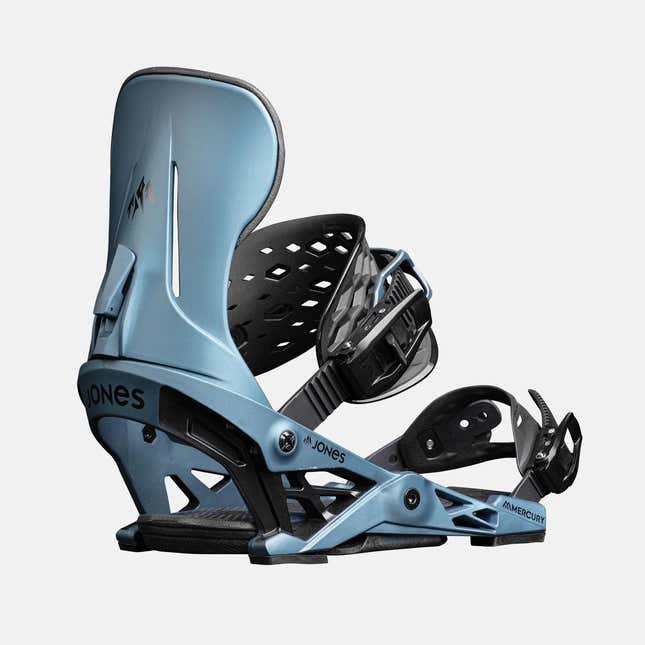
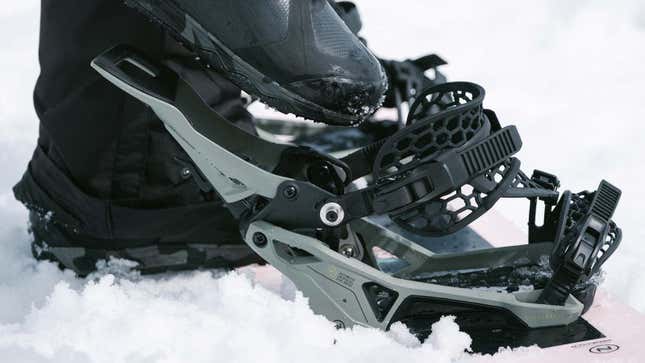
Jones Mercury - $245
Responsiveness is the name of the game here. I swear sometimes it felt like I would just think about the turn I wanted to make, and it was done already. The secret sauce is something Jones calls “Skatetech,” which has a kingpin in the middle of the binding that acts like a fulcrum, giving you more leverage. What that means is that when you lean, the force is translated more directly to the edge you’re turning onto, which is where you want it. It’ll take a handful of laps to get used to if you’re coming from traditional bindings, but you’ll really appreciate it with wider boards (like the Excavator), in tight trees, or when you’re really laying into carves. The one area that could improve is in the ladder/ratchet system. I found that sometimes it wouldn’t crank down as hard as I wanted, and other times it would lock up and not let me out without some wiggling.
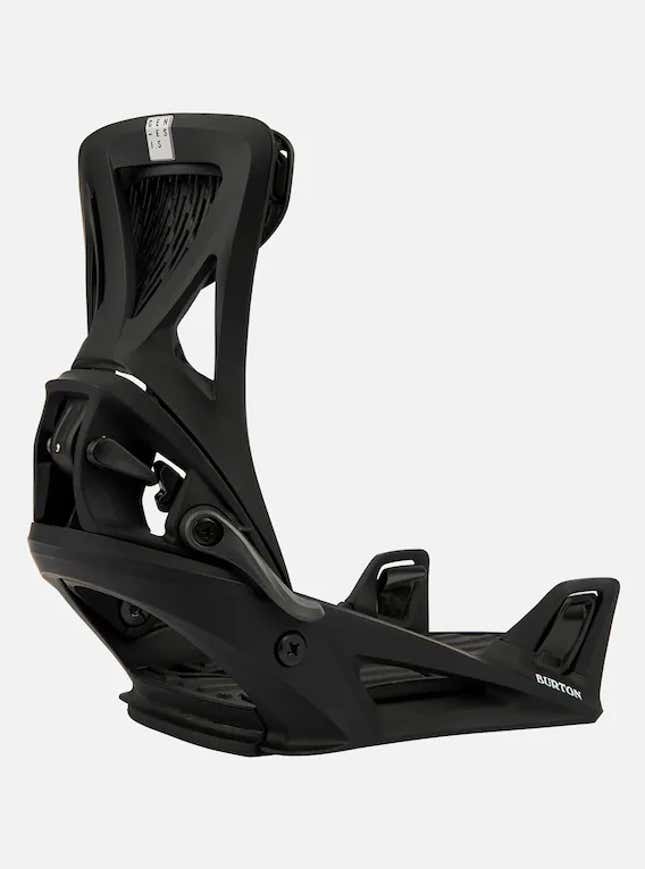
Burton Step On Genesis Re:Flex - $380
Step-on bindings are somewhat divisive. Unlike traditional bindings with straps, with these, you can just step into them and you’re good to go. Some people just don’t trust them as much as traditional bindings, but personally, I’ve joined the other camp. I’ve tested several generations of these now, and I find them to be incredibly responsive, and my boot has never once popped out of them, even during some pretty gruesome crashes. The Genesis Re:Flex is the most comfortable Step On that Burton has made yet, thanks to the “hammock” in the highback. It helps dampen chatter, and it feels a lot better on your lower calf, yet it actually manages to be more responsive than previous years’ models. They are by far the easiest bindings to get into and out of, and just being able to stomp down and go ends up saving a lot of energy over the course of the day (especially great for aging boarders or those with limited mobility). They are also some of the lightest bindings on the market. There are a couple of caveats, though.
The biggest is that these bindings are only compatible with Burton Step On Boots (or brands that Burton has partnered with). Boots are a very personal thing, and if you can’t find a pair that are comfortable, then this system isn’t going to be good for you (this hasn’t been an issue for me, personally). Step On boots may also cost a bit more, making this a pricey system overall. The other issue is that these bindings can be a bit hard to click into if you’re in deep powder or if you’re toe-side on a very steep hill. This is because you need some resistance on your heel edge in order to click in. That’s why I don’t recommend these if you do a lot of backcountry or steeps, but for the vast majority of resort riding, these are great.
Nidecker Supermatic - $400
Honorable mention for these because I love the concept, and the tech is great, but ultimately, they came up a bit short for me. These bindings are trying to combine the best of both of the above-mentioned worlds: bindings you can just step into (like the Burtons above), and the security of a two-strap system you can use with any boot. It’s really pretty brilliant. You put on the bindings like a traditional set, but then you pull a lever and the highback drops backwards. You lift your heel out and the binding pivots to help you release your foot. When you want back in, you just kick your toe into the cup and stomp down with your heel. There’s even a roller so your foot slides in easier, and a hinge mechanism that brings the highback back up to meet your calf. It’s such a great concept!
Unfortunately, in my testing, it didn’t quite execute. If I ratcheted the straps down tightly (which I prefer), then it was really hard to get in and out of the binding. If I was on any kind of slope, I would start sliding downhill while trying to wiggle my foot in. If I left the straps looser, then my boot would slide around in the binding as I rode and would lose responsiveness, which could be deadly if you like to ride through trees. Also, these bindings are seriously chonky. They’re just big and heavy, and you really feel that extra weight when it’s hanging off one foot on the chairlift. Ultimately, I think they’ve got a great idea here, but it feels like a first-gen product, and it needs to be cleaned up a bit. Can’t wait to see what comes next.
The Best Snowboard Boots
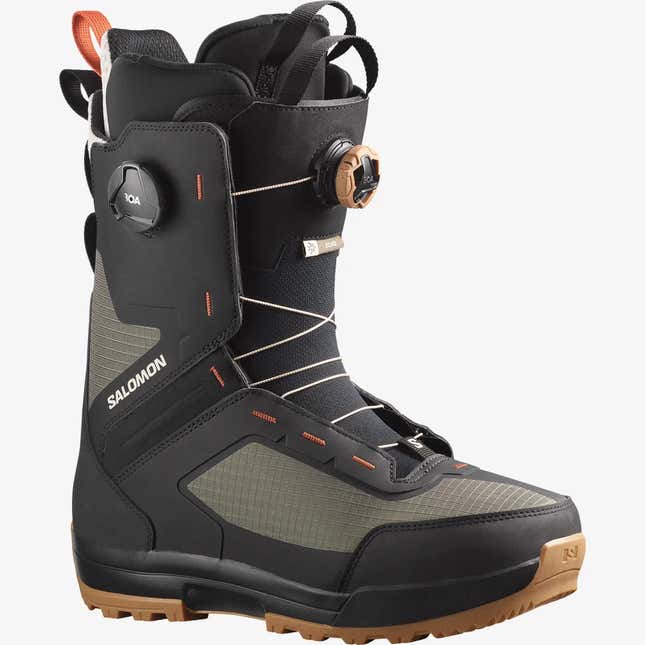
Salomon Echo Dual Boa (Men’s) - $430 / Kiana Dual Boa (Women’s) - $370
Salomon is known for making one of the most highly-regarded ultra-stiff boots out there with it Malamute model, but for all but the most hardcore of backcountry riders, that may be a bit overkill. The Echo is a new model from Salomon (available in traditional laces or the Dual Boa I tried), and it ticks all of my boxes. It has the warmest, most comfortable liner I’ve ever tried, and it absolutely locked my heel in place. The dual boa system makes adjustments super easy, and the outsole is burly enough to provide traction on sketchy hikes. It’s a very stiff boot (I’d say 8 out of 10), and that translates to responsiveness. The Echo is also packed with recycled and other eco-friendly materials, and pairs extremely well with the Jones Mercury bindings mentioned above. Note: Salomon doesn’t have a direct analogue of the Echo boot for women, but the Kiana Dual Boa is the most similar. Would be great to see a full-on version built for women.

Burton Photon Step On (Men’s) - $460 / Burton Felix Step On (Women’s) - $460
As mentioned above, if you want to use Burton’s Step On bindings, then you need some Step On boots (they have special metal cleats that lock the boots into the bindings). The Photons hit the sweet spot for me. They’re on the stiffer side (which you need when you don’t have straps on your bindings), but they’re still very comfortable. I also tried the new Ion Step Ons, but they were less comfortable, and I had issues with the lacing system, whereas the dual boa system on the Photons never let me down.
The Best Snow Goggles
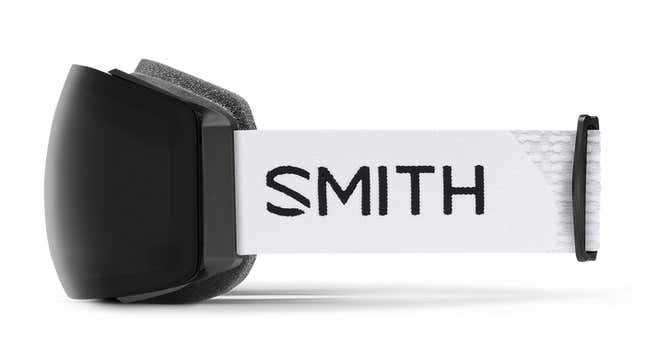
Smith I/O Mag Imprint 3D - $450
We’re going to start with the money-is-no-object pick, because these are the best goggles I’ve ever worn. They’re also the most expensive goggles I’ve ever worn. So, it’s a giveth/taketh-away kind of situation. These are custom-molded goggles. You scan your face with an iPhone app, choose the lenses you want (it comes with two), and a week or two later, your goggles arrive at your door. Because they 3D-print the plastic frame to match your face perfectly, that means they can use much less foam padding. Not only does that reduce bulk (and the need to over-tighten the goggles to prevent air-gaps), but it increases your field of view because the pane is so close to your eyes. The lenses are extremely sharp and easily swappable. These goggles are very expensive, but they’re also fantastic. Smith’s lenses are incredibly clear, too.
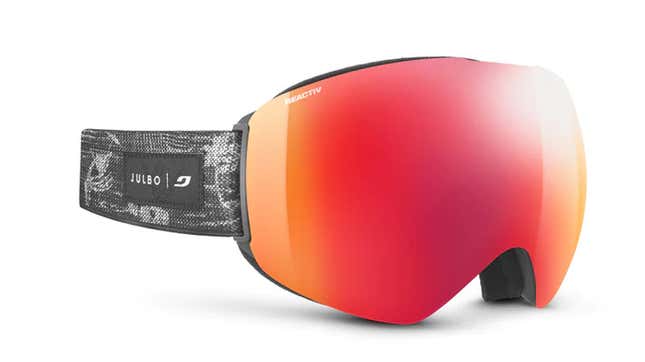
Julbo Reactiv 0-4 Skydome - $280
Julbo certainly isn’t the only brand that does photochromatic lenses, but these blow the rest out of the water. Photochromatic lenses change tint depending on the amount of ambient light, so if it gets super bright and sunny, the lenses turn dark to protect your eyes, and if it’s stormy and shadowy, they clear up to let more light in. The problem is that most photochromatic lenses don’t vary all that much or react fast enough for my taste. The new Reactiv 0-4 line provides the widest range on any photochromatic lens, and by a long shot. It goes from 80-percent visible light transmission (which is pretty close to clear glass) all the way to just 7-percent when it’s sunny, and the lens gets more amber to enhance contrast. I found that it changed quickly enough that I never had issues with it, even when riding in and out of trees on a sunny day, and during full-on blizzards with patches of sunlight. You can get the new Reactiv 0-4 lenses in six different styles. I went with the Skydome model for maximum field of view, but if you do a lot of hiking in the backcountry, the vented Aerospace model is worth the extra money. These sold out almost immediately, so if you click the link above, you’ll see the Skydome 2-3, but the 0-4 isn’t currently in stock. Keep checking back, though.
Glade Adapt 2 - $150
Hey look! High-quality, budget-friendly goggles exist! I was really impressed by these. The optics were very sharp, and they didn’t fog up easily. They also use photochromatic lenses, and while their 14%-54% visible light transmission range isn’t nearly as wide as the Julbo’s above, they’ll still cover you for the majority of conditions (though you’ll still want to pack a low-light lens on really dark, cloudy days). I found them to be quite comfortable. Great quality for the price.
The Best Snow Helmet
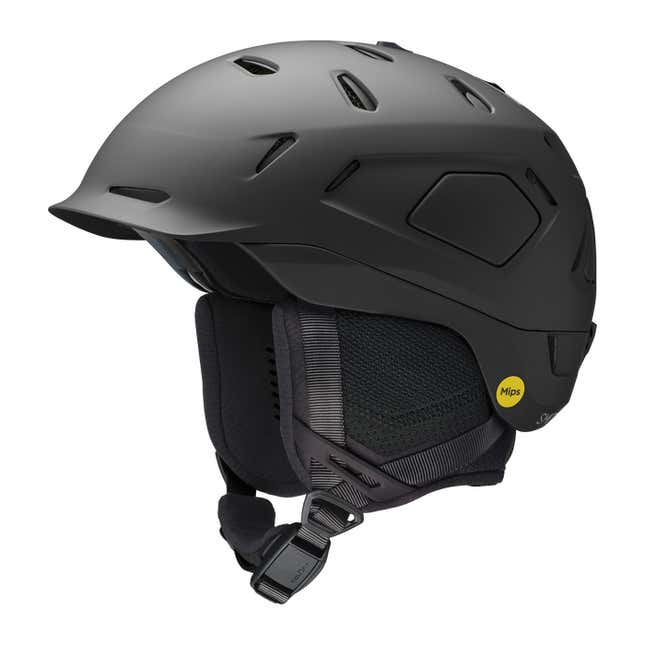
Smith Nexus MIPS - $325
This helmet just does everything right. It’s constructed with two separate layers (a hard exterior for protection, and a lightweight inner layer that cradles your cranium), with a thick layer of Koroyd in the middle. Koroyd is a bunch of welded tubes sandwiched together like honeycomb. It’s extremely lightweight, air flows right through it, and it provides excellent impact absorption. The helmet is Mips certified, which means it also helps protect against more dangerous rotational impacts. It has a whopping 24 adjustable vents, which you can open and close with the flick of a switch (two switches, actually, in case you just want to open one set), so it breathes better than any full-coverage helmet I’ve used. It has an excellent magnetic strap buckle, a Boa in the back for fine tuning the fit, and the ear pockets are audio-compatible (see below). I’ve bulldozed through more tree limbs than I probably should, and this helmet has protected me throughout, and it still looks brand new. I also find it extremely comfortable, though your mileage/head-shape may vary. Not cheap, but it’s the best helmet I’ve ever used, and I consider it an insurance policy.
The Best Winter Gloves
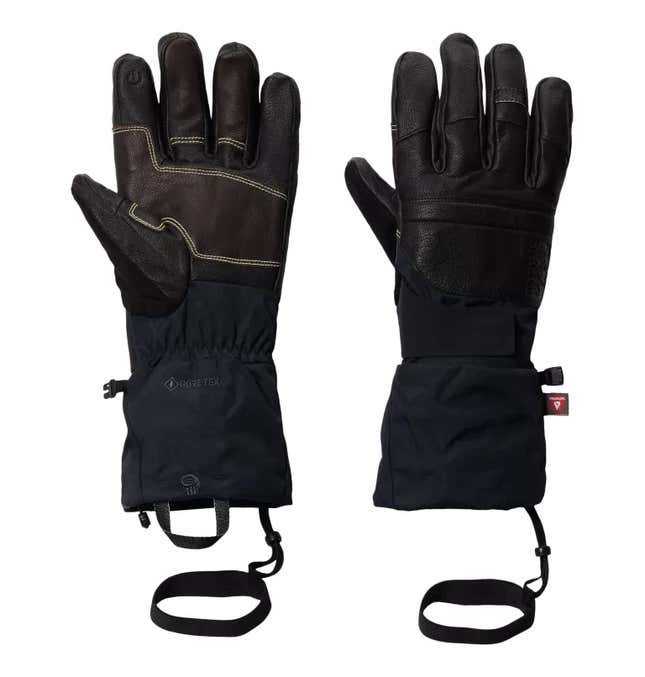
Mountain Hardwear Boundary Ridge Gore-Tex Gloves - $190
This is the warmest and driest my hands have ever been for a ski season. These gloves are absolutely packed with PrimaLoft Gold (which features shredded aerogel) and is arguably the warmest synthetic insulation out there, gram-for-gram. Despite that, they retain excellent dexterity. They have a Gore-Tex shell, which keeps them waterproof, and it’s inlaid with Pittards goat leather in heavy use areas. It feels like these gloves will last for years (which is good, because they aren’t cheap). It also has touchscreen compatible fingers, so you don’t have to take them off just to check your messages or find your location on a map. Touchscreen compatibility has become a mandatory feature for me, as gloves can only keep you warm when they’re on your hands. It has nice long cuffs that cinch down tightly, elastic leashes so you don’t drop one off a chairlift, and a very soft liner inside. The one thing I wish they’d add is a zippered compartment for a heat pack on the absolute coldest days, but still, these are the best gloves I’ve tried. These gloves are listed in both men’s and women’s sections of the Mountain Hardwear website.
The Best Snow Sports Backpack
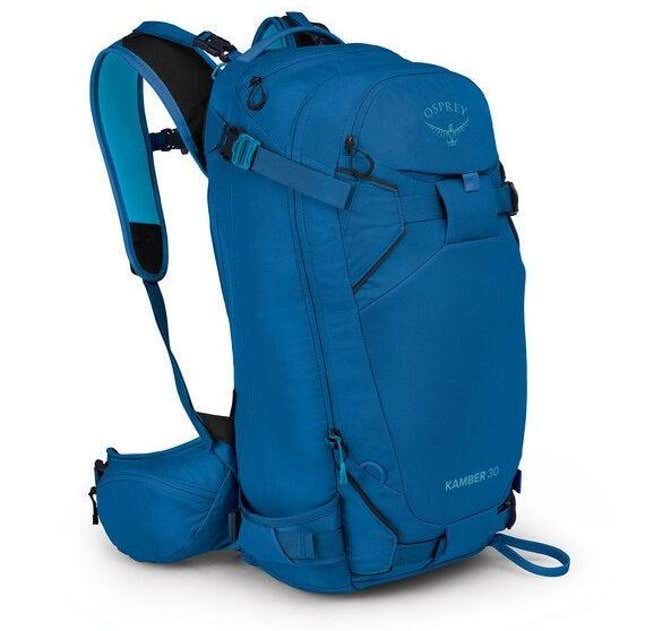
Osprey Kamber 30 - $210
I’ve tested a long list of backpacks that were almost perfect but were missing some feature or other. This is the first one where I’ve felt like there are no compromises. It’s lightweight, comfortable, and slim enough that I can wear it on most chairlifts. It has two cavernous pockets that absolutely swallow gear (such as layers, snacks, shovel and probe), plus a bunch of small pockets for organizing the little things (including two pockets on the hip straps). It has straps for carrying snowboards or skis if you’re hiking, and a hammock to carry your helmet. It’s hydration pack compatible and it has an insulated sleeve for the hose to help keep it from freezing up. It has large pull-tabs on the zippers so they’re easy to grab with your gloves, and it even has a little built-in padding to help protect your back and your gear. I consider it the new high-water mark for all-mountain snow backpacks.
Snowboarding and Skiing Outerwear (bibs, pants, and jackets)
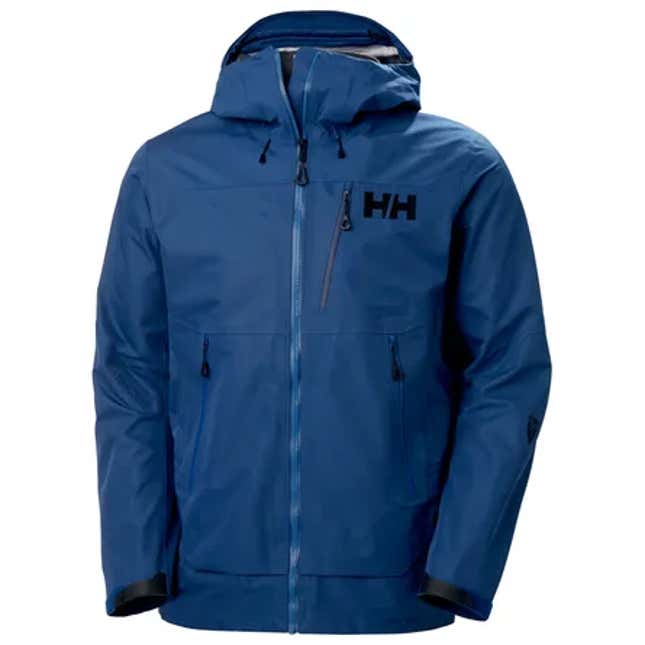
Helly Hansen Odin Infinity Jackets and Bibs - Men: $350 & $425 / Women: $700 & $250
In my book, a good shell is your most important layer. It keeps you protected from wind, wetness, and even things that might scrape you up. I’ve been really impressed with what Helly Hansen has been doing with materials lately, and its flagship is the LIFA Infinity Pro fabric it uses for its high-end Odin line of outerwear. LIFA Infinity has a unique construction. While most shell fabrics rely on a chemical-based water-repellant treatment (DWR) to be waterproof, LIFA is woven in a way that makes it waterproof on its own. That means no extra chemicals, and the garment doesn’t get less waterproof with age. With most shells, you have to reapply a DWR treatment after a while in order to keep dry. I’ve used this stuff in extremely wet conditions, and I’ve never had an issue with water getting through. Now, it’s not as soft and stretchy as some of the other three-layer shells out there, but I think the pros easily outweigh the cons. The one thing that I really want to see Helly integrate is mesh-covered inner-thigh vents. Those make such a huge difference for cooling off, and it’s a shame to see them left out. Still, these shells are excellent. Currently the men’s bib is out of stock, but it should be back in again soon.

Patagonia Storm Shift Jacket and Pants – Men Jacket $240 & Pants $380 / Women Pants $190 & (Jacket sold out at Patagonia, but you may be able to find them elsewhere)
This is sort of another materials story. These pieces from Patagonia are among the first to use the new Gore-Tex ePE membrane. What’s special about that? No Perfluorinated compounds (i.e. PFCs). PFCs are what’s known as “forever chemicals” that do not biodegrade. They get into our water supply and our oceans, and they are extremely bad for basically all living things. There’s been a big push in the outdoor industry to get PFCs out of the gear we use, and these garments are among the first. I’m happy to report that I didn’t notice any sacrifices in quality, waterproofiness, wind-repelling, or breathability. The jacket and pants both kept me extremely dry and were comfortable to wear (especially the jacket, with its lovely fuzzy fleece around the neck). The one thing I wish is that Patagonia used this material for a bib, as I am a strong believer in bibs instead of pants (and see above note about mesh thigh-vents). Hopefully next season. These bits of kit sold like hotcakes, so they’re hard to get your hands on right now, but search online retailers and you might get lucky (and they’ll be back for next season).
Insulating Layer / Mid Layer
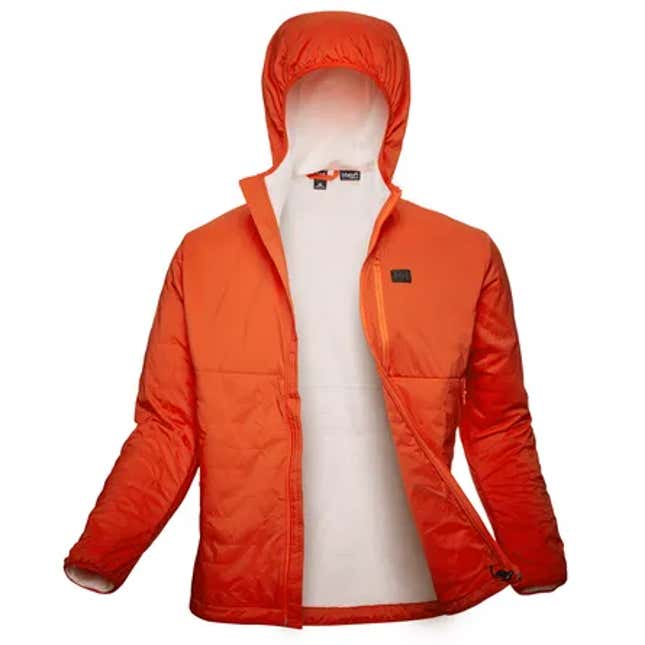
Helly Hansen Lifaloft Air Jacket – Mens: $150 / Womens: $150
My new favorite mid-layer layer is the Lifaloft Air. It somehow occupies a magical space between a lightweight fleece and a puffy, but it’s been my go-to in an extremely wide range of temperatures. Despite being nearly as warm as a puffy, it breathes massively better. This is because it’s open on the inside, so the soft, fuzzy Lifaloft fabric is free and points inward. It also wicks moisture like crazy, so sweatiness hasn’t been an issue. If it starts getting hot mid-day, it compresses down to the size of a softball, so it’s easy to stuff into even the smallest backpack or jacket pocket. It has nice, big pockets, too. I was honestly skeptical about this thing, but it wildly exceeded my expectations.
Base layer

Icebreaker Marino 200 Oasis Thermal Leggings and Long Sleeve Half Zip Top – Men’s Top $115 & Leggings $105 / Women’s Top $115 & Leggings $105
I am all-in on all-Marino wool base layers. They keep you warm, even when damp, and they breathe extremely well. They even have natural anti-stick properties. Frankly, there is a ton of really good Marino gear out there, but Icebreaker’s stuff has consistently been my favorite. Its 200-weight line provides the perfect amount of warmth for a base-layer. In the winter, I’ll usually wear it with the above-mentioned mid layer, and in spring I can wear it on its own under my shell (sometimes without the shell, on especially hot days). Love that the men’s leggings have a fly (you’d be surprised how many don’t!). They’re comfortable and long lasting, too.
Socks
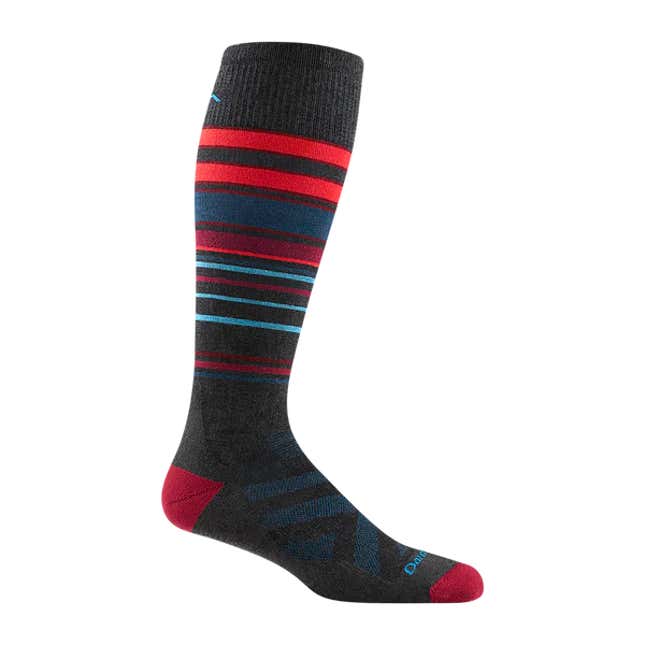
Darn Tough Snowpack Over-the-Calf Midweight – Men’s $29 / Women’s $29
I will never stop talking about these socks, and I never have to because they’re guaranteed for life (with free repair or replacement). Made in Vermont, these are almost certainly the best socks you’ll ever own. The midweight version of these socks provide a bit of extra warmth (which I almost always want, though they also have lightweight and ultralight if you prefer), and they’re specifically built for skiing and snowboarding. They have a little extra cushion at your Achilles tendon which helps prevent heel lift. They have strategically placed vents. They have just enough stretch to keep them from slipping down without cutting off circulation, and because they’re mostly Marino wool, they keep you warm even when wet and help prevent stankyfoot. They’re just the best.
Balaclava and Hat
Blackstrap Expedition Hood Balaclava Facemask - $40
Not only does this balaclava style facemask protect your face from the sometimes blistering sun (it’s SPF 50+ and I’ve never been burned through it), but its dual-layer construction provides excellent protection from wind. If you’ve ever skied or snowboarded when the mercury drops way, way below freezing, you know how valuable a layer like this is. Despite that, I can breathe through it easily, it vents well so it works in a wide range of temps, and its hinged design makes it easy to flip up and down, even with thick gloves on. It’s an added layer of insulation under your helmet, and it keeps your neck warm, too. Love it.
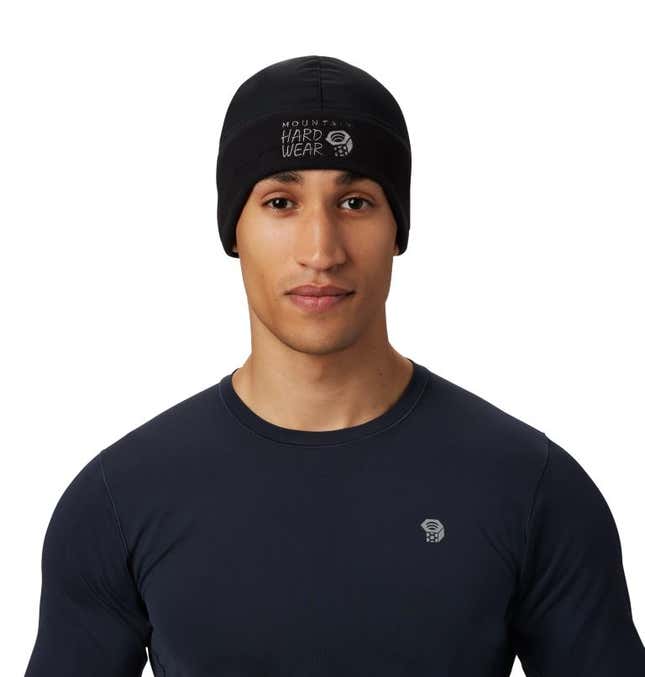
Mountain Hardwear Dome Perignon Pro Hat - $40 (unisex)
This is the slimmed-down version of my all-time favorite beanie—the Dome Perignon. The Pro version isn’t quite as warm, but it’s sleek enough to fit underneath your helmet, so it provides extra protection on the coldest of days. Usually, I just keep it in my jacket pocket and put in on when I stop for lunch. It’s made with Gore-Tex Windstopper fleece, and it’s amazing how well it protects your ears and head from cold, cutting wind.
The Best Snow Sports Audio
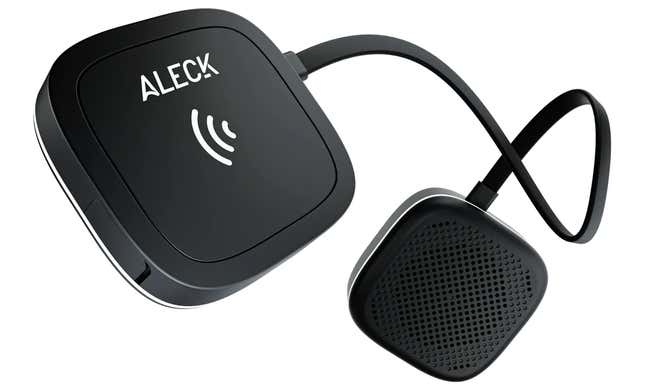
Aleck 006 - $130
Most snow helmets these days (including the Smith above) feature pockets in the ear flaps where you can drop in a set of flat Bluetooth headphones. While a handful of companies make these speakers, none of them sound as good as the Aleck 006. I’m very nitpicky about audio quality with my music, and these are incredibly well-balanced, have a satisfying amount of bass, and the snares don’t threaten the integrity of your eardrums. The Aleck 006 also strives to work as a sort of walkie-talkie. When paired with the Aleck app, you can click one of the buds to talk to your friends who are also on the app (you can use any Bluetooth headphones with it, actually), or constantly chatter in party mode, or quickly find them on a map of the resort. At least, you’re supposed to be able to.
I tried it with two other friends, and we all struggled to get the walkie-talkie feature to work. Firmware updates frequently crashed while downloading, sometimes voice messages would come through right away, sometimes they’d be a minute delayed, and sometimes they wouldn’t come at all. The mapping feature never worked for us, either. Now, we were all on Android phones (what are the odds?), and we were all at a resort where our reception wasn’t fantastic, but still, for a safety feature like that, it needs to be super reliable. Despite that, the Aleck 006 remains the best in-helmet audio solution out there, so it’s still my recommendation. Let’s hope the app gets some more love over the summer.
The Best Avalanche Beacon

Mammut Barryvox S - $550
Of all the things you hope you’ll never need, but it needs to work perfectly when you do, an avalanche beacon is right up there at the top of the list. The Barryvox S is the most intuitive, user-friendly transceiver I’ve tried. It features three antennae with a search area of up to 70 meters (230 feet) and a big, glove-friendly switch for changing to search mode when you need to. It’s also lightweight, compact, and rugged. What sets this beacon apart from the rest, though, is its 2.2-inch graphical display that very clearly points out the direction, distance, and number of buried targets. The intuitiveness makes it especially good for those who only occasionally go into the backcountry and don’t get to practice as often.
The Best Ski/Board Bag
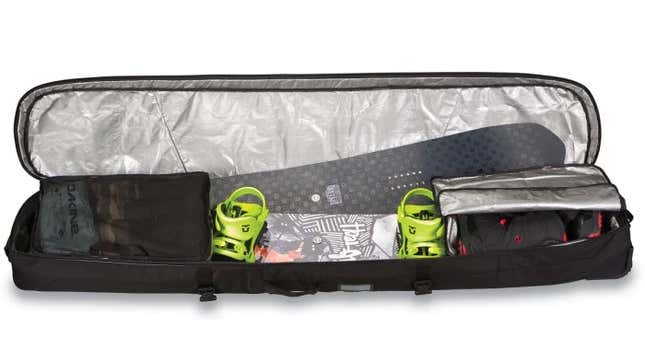
Dakine High Roller - $290
If you’re flying to your snowy destination, you really want to make sure your skis/board and other gear are going to make it in one piece. The Dakine High Roller is an exceptional bag. It’s so roomy that it will often be the only bag I take on a weeklong trip (aside from a small backpack, like the Osprey above). I’ve tossed three snowboards, two sets of bindings and boots, two helmets, and a bunch of outerwear into it, and it had no issues. The wheels roll smoothly, and you can strap the top handle to a rolling suitcase if you have one. It has two removable bags on the inside for boots and outerwear, and two large pockets on the outside for other small accessories. The main YKK zipper is lock compatible, and it has a pair of compression straps. The exterior is super tough, too. The one place it could stand to improve would be a stronger inner liner, as the nose of my snowboard has caused mine to tear a bit, but it still works like a charm.
The Best Learn-to-Ski Gadget
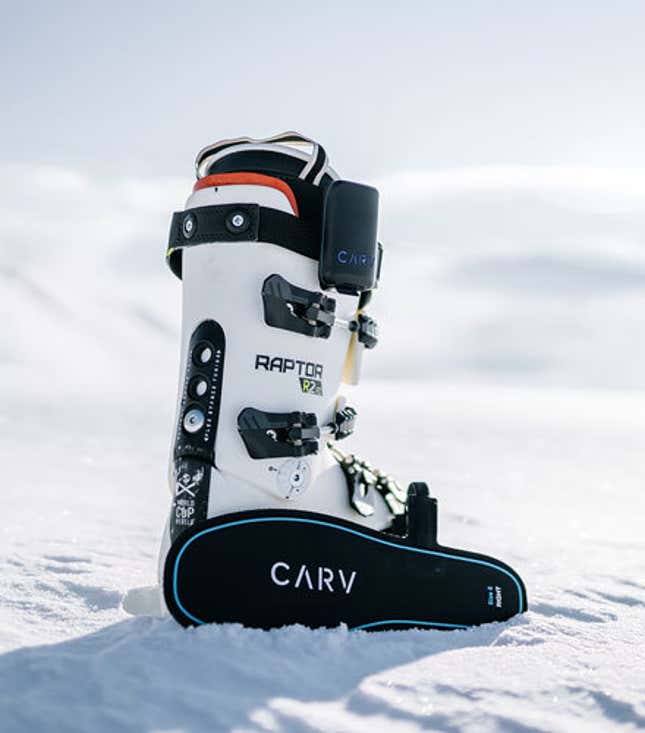
Carv - $199 + subscription
This is one of those “I didn’t believe it until I tried it,” kind of things. While I’m a solid snowboarder, I am a very terrible skier. Or at least I was until I spent a couple of days with this digital ski coach system. Now I’m merely a mediocre skier, but it was the first time I’d ever really had fun on two planks. Carv is a hardware and software solution, consisting of a pair of insoles, a transmitting puck, and an app. Each insole packs in 36 sensors that measure exactly how much pressure you’re putting where. At the same time, the battery pack has an accelerometer and gyroscope that it uses to track stats like speed and angular velocity, and Bluetooth sends that info to the app, which crunches the numbers and gives you live coaching in your ears (via in helmet audio, like the Aleck 006 above). It can be as laid-back as a few tips after each run, or as granular as scoring every single turn you do.
The crazy thing is that it actually works. The Carv team fed the algorithm so much data that it really knows what good turns and bad turns look like, and the digital coach does a great job of explaining what you need to do to improve (it also has detailed videos that match the advice you’re receiving, which you can watch on the chairlift back up). I made an astonishing improvement in just two days with this thing. Now, to get all the best features, you need a subscription in addition to the gadget itself, and the subscription is $200 for a year (or $150/year if you get a two-year package). That’s pricey, but a couple days of lessons with a real ski instructor could easily cost more, and they can’t see inside your boot to tell you exactly what you’re doing wrong (for example, I needed to continue pressing with my heels longer into my turns than I thought). It’s good for people who have just skied a day or two, or for experts who really want to refine their carving game. I was shocked by how well the system worked. Wish they made a version for snowboarding…
Glossary:
Powder: Generally refers to a thick layer of freshly fallen snow. It’s soft and ungroomed, and it’s the absolute best.
Float: As the word suggests, float is a property of a snowboard or skis that allows you to glide across the surface of soft powder snow rather than sink down into it. Really, it’s more about hydroplaning than buoyancy.
Carve: Carving is when you lay the edge of your snowboard (or edges, in the case of skis) into the snow and apply enough pressure that you effectively draw a long, thin line in the snow, without much skidding. If done properly, you carve a nice pencil-line of a trench behind you, and you better maintain your speed vs a skidded turn.
Switch: For snowboarding, you generally choose your stance when you set up your bindings. The two options are Regular (left foot forward) and Goofy (right foot forward). Riding switch is when you ride with the opposite forward from your usual stance.
Directional shape: A twin board is symmetrical between the front and back so it can be ridden either way. A directional board has a more clearly defined nose and tail and is less-good for riding switch stance, but is better for a wider range of conditions/circumstances (especially in powder).
Setback: On a snowboard, a setback means your bindings aren’t set right in the middle of the board but rather back a bit toward the tail. This helps you sink your back foot and keep your nose up, especially in powder.
High-volume: A board (or skis) with lots of surface area that will help it hydroplane over snow, especially powder.
Groomers: Groomed ski runs that have been tamped down with a large snowcat to smooth everything down. Also known as piste, and sometimes corduroy.
Sidecut: Refers to the shape and depth of the curve cut into the edge of the snowboard or skis, which impacts your turning radius.
Highback: The back part of a snowboard binding that presses against your heel and lower calf.
Avalanche beacon/transceiver: A device worn by you and everyone in your party when skiing in avalanche-prone areas, especially in the backcountry. They allow you to find a friend in the event that they are buried under the snow, or for them to find you.
Boa: A tightening system that replaces boot laces and other similar items. It’s a disk that click-tightens some cordage, thus giving you a more precise way to dial in your fit.